In-App Help was last updated in 8.6.4 (released 10/23/2019) if you are looking for help with a feature that has been added or enhanced since 8.6.4, please check in Online Help from Help menu.
Setting Up Effort Distribution Value Sets for Tasks
Note: Your Staff Manager configuration may not include this optional application. To add this application to your configuration, contact your Clinical Consultant or Client Advocate.
After Enterprise Administrators have configured the field names, rules, and notifications for the Effort Distribution interface and the Labor Distribution Value import has been run to populate values for the interface, you need to identify the tasks that are associated with a configured set of valid Effort Distribution values. As these tasks are assigned to providers, the interface sends Effort Distribution values associated with each task to the Infor Labor Distribution system.
Each set of Effort Distribution values you associate with a task has a start and end date. These dates determine the period that specific set of values are in effect for the task. You can configure more than one Task Set of Effort Distribution values for a task, but the date ranges for the value sets cannot overlap.
To access this page, you must have the correct security permissions, and you must be a member of the Scheduling Administrator group. Your task access is limited to tasks on profiles to which you have administrative access.
Complete the following steps to set up Effort Distribution Value Sets for tasks:
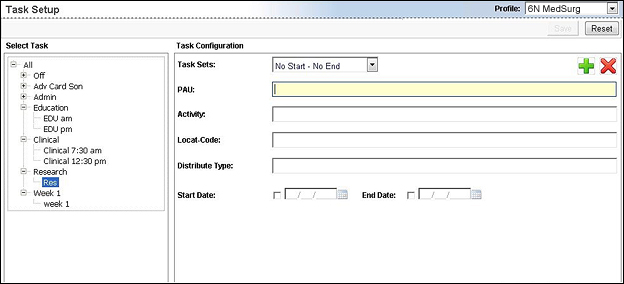
- From the Configure menu, select Interface Mappings > Effort Distribution > Task Setup. This opens the Effort Distribution Task Setup page.
- Select a profile from the menu. This populates the Select Task pane with that profile's available tasks.
- Select a task from the Task pane. If you cannot see the task you want to select, expand its Assignment by clicking the plus sign (+) beside the Assignment name.
- Tasks names in bold already have an active configuration. When you select such a task, its values display in the Task Configuration pane. You can then edit those values.
- If your selected task does not have a value set configured for it, the values in the Task Configuration pane is blank.
- Click the green plus icon
 . This opens the task configuration for editing.
- The first box is Task Sets, which displays the start and end effective dates for the set of Effort Distribution values. When you first begin the setup, this box is blank. It then populates dynamically as you select values or as you manually set start and end dates for the set you are defining. If you leave the start and end dates unselected, Staff Manager sets the date Task Sets value for you automatically using the start end dates of the defined Effort Distribution Value Sets.
- For each required field, begin entering your desired value. The selection list filters itself dynamically as you type from the database of valid values. Select your desired value. If your selection makes completion of another field required, the solution highlights that field with a yellow background. Be aware that, where necessary, the solution filters the values available for selection in any field to only those allowed based on a prior selection. For example, selecting a specific department in one field may limit the list of available values in the next field to those compatible with that department.
- A yellow background in any box means that field is required and you must select a value for it. Fields without a yellow background are not required, but you can complete values for them if desired.
If you change the value in a field for which you had previously selected, the solution clears all fields below that field and you have to repopulate them. This is necessary, as your selected values affect which values you can validly select in fields below them.
- The Save button becomes enabled when the final required value has been selected. If Save is unavailable, you have not selected a value for all required fields.
- If you want to set the start date upon which the set of values you have just defined becomes effective manually, select the check box in front of the Start Date box. This enables the date menu and you can select a Start Date from those available through the date menu. Be aware that if your values set contains an activity value that is date effective, the start dates you can select are limited to the date effective range of that value. For example, if the activity were valid from 01/01/2014 to 12/31/2015, your selected start date would have to fall between those dates and be before the currently selected end date.
- If you want to set the end date upon which the set of values you have just defined stops being effective manually, select the check box in front of the End Date box. This enables the date menu and you can select an End Date from those available through the date menu. Be aware that if your values set contains an activity value that is date effective, the end dates you can select are limited to those within the date effective range of that value. For example, if the activity were valid from 01/01/2014 to 12/31/2015, your selected end date has to fall between those dates after the currently selected start date.
- Click Save to save your changes.
You can click Reset to undo any edits made since you last saved the configuration.
The following illustration displays the Task Setup page.
Editing Effort Distribution Value Sets
These fields do not use menus. The selections for each yellow field are dynamic, meaning the solution uses the database to provide you only active and valid selections. For each selection you make, the number of valid selections for the next field is more limited. You can only select correct values for any field.
- From the Configure menu, select Interface Mappings > Effort Distribution > Task Setup. This opens the Effort Distribution Task Setup page.
- Select the profile from the menu.
- Select a task from the Task pane. If you cannot see the task you want to select, expand its Assignment in the Task tree. Since you are editing an existing value set, the Task name is in bold font.
- Click Add. This opens the task configuration for editing.
- The first box is Task Sets, which displays the start and end effective dates for the Effort Distribution values set you are viewing. When editing a set of Effort Distribution values, these set dates change dynamically as you select values or as you manually select start and end dates for the set. If you leave the Start and End Dates unselected, Staff Manager sets the Task Sets value for you automatically. If the task had a previous set of values, the start date automatically calculated for the set is the latter of the end date of the previous set of values plus one day or, if you select an activity value, the first day the activity value is valid.
- A yellow background in any box means that field is required and you must select a value for it. For each required field, begin entering your desired value and the selection list filters itself dynamically as you type. Select your desired value. If your selection makes completion of another field required, the solution highlights that field with a yellow background. Be aware that, where necessary, the solution filters the values available for selection in any field to only those allowed by a previous selection. For example, selecting a specific department in one field may limit the list of available values in the next field to those compatible with that department.
- Fields without a yellow background are not required, but you can complete values for them if desired.
If you change the value in a field for which you had previously selected, the solution clears all fields below that field and you have to repopulate them. This is necessary, as your selected values affect which values you can validly select in fields below them.
- The Save button becomes enabled when the final required value has been selected. If Save is unavailable, you have not selected a value for all required fields.
- If you want to set the start date upon which the set of values you have just defined becomes effective manually, select the check box in front of Start Date box. This enables the date menu and you can select a Start Date from those available through the date menu. Be aware that if your values set contains an activity value that is date effective, the start dates you can select are limited to the date effective range of that value. For example, if the activity were valid from 01/01/2014 to 12/31/2015, your selected start date would have to fall between those dates and be before the currently selected end date.
- If you want to set the end date upon which the set of values you have just defined stops being effective manually, select the check box in front of the End Date box. This enables the date menu and you can select an End Date from those available through the date menu. Be aware that if your values set contains an activity value that is date effective, the end dates you can select are limited to those within the date effective range of that value. For example, if the activity were valid from 01/01/2014 to 12/31/2015, your selected end date would have to fall between those dates after the currently selected start date.
- Click Save to save your changes.
 Related Topics