In-App Help was last updated in 8.6.4 (released 10/23/2019) if you are looking for help with a feature that has been added or enhanced since 8.6.4, please check in Online Help from Help menu.
Building Effort Distribution Rules
Note: Your Staff Manager configuration may not include this optional application. To add this application to your configuration, contact your Clinical Consultant or Client Advocate.
A rule allows you to define an If-Then correlation between two fields. For example, one rule might state that if the value selected in the PAU field starts with the numbers 91, then you must select a value for Activity field. Another restriction is that the required field must have a higher field number than the rule field, since it is the selection in the required field that dictates whether you must select a value in the rule field. For example, if the Independent Field's field number is 4, the Required field must have Rule selected and have a field number of 5, 6, 7, or 8.
Rules are limited to one level; that is, you can only create one condition per rule. To create a rule, one of the two fields must be marked as Required and the other marked as Rule. You set these values on the Effort Distribution Field Setup tab.
If you set up a field on the Effort Distribution Field Setup tab that requires a rule, you must create the rule using the Required Field Rule Setup tab.
Complete the following steps to build Effort Distribution rules:
- From the Configure menu, select Interface Mappings > Effort Distribution > Field and Notification Setup. This opens the Fields and Notification Setup page. The Effort Distribution Field Setup tab is active by default.
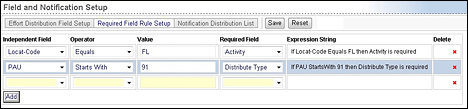
- Click the Required Field Rule Setup tab. This opens the Require Field Rules table. Items that you must complete display a yellow background.
- Select an Independent Field from the menu. Options include the fields where you selected Yes from the Required menu on the Effort Distribution Field Setup tab.
- Select an Operator from the menu. Options include Starts With, Ends With, Contains, and Equal.
- Enter a Value that defines the condition upon which the rule-based field is recorded. Note that these values are usually numbers, but may be letters, depending on your organization's configuration. You can enter up to 32 characters.
- Select a Required Field from the menu. Options include the fields where you selected Rule from the Required menu on the Effort Distribution Field Setup tab and where the field has a number that comes after the Independent Field’s field number.
- Click Save to save your changes.
The Expression String column then displays your new rule as an If-Then statement. For example, if you selected PAU from the Independent Field menu, Starts With as your Operator, 91 as your Value, and Activity from the Required Field menu, the Expression String column displays If PAU Starts With “91” then Activity is required.
To create additional rules, click Add. This opens an editing row for your new rule.
Be aware that any additions or changes you make to rules only become effective after the next Infor Labor Distribution Value import runs to populate the data in Staff Manager.
Editing a Rule
- From the Configure menu, select Interface Mappings > Effort Distribution > Field and Notification Setup. This opens the Fields and Notification Setup page. The Effort Distribution Field Setup tab is active by default.
- Click the Required Field Rule Setup tab. This opens the Require Field Rules table.
- Make the changes you want.
- Click Save to save your changes.
Deleting a Rule
- From the Configure menu, select Interface Mappings > Effort Distribution > Field and Notification Setup. This opens the Fields and Notification Setup page. The Effort Distribution Field Setup tab is active by default.
- Click the Required Field Rule Setup tab. This opens the Require Field Rules table.
- Click the Delete icon. This displays the following alert message: Please note, the change intended when deleting this required field rule will not take effect until the value no longer required is reimported. Remove this rule?
- Click OK to remove the rule or Cancel to return to the rule builder without removing the rule.
 Related Topics