In-App Help was last updated in 8.6.4 (released 10/23/2019) if you are looking for help with a feature that has been added or enhanced since 8.6.4, please check in Online Help from Help menu.
Understanding the Patient Assign Page
The Patient Assign page provides one central point from which to view and act on patient assignment information. The page is divided into two sections.
- Selection and General Information: This section lets you change the date, profile, and partition shown and provides basic information about the patients and caregivers for the selected view.
- Summary Table: This section provides a summary of current patient assignments by patient or caregiver.
Selection and General Information
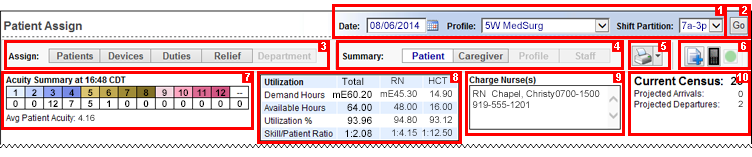
- Selection bar: Here you can select the date, profile, and shift partition you want to view.
- Go button: Once you make your selections, click Go. The page refreshes to show the new data. You can also click Go if you want to refresh the data on the page to reflect ADT or staffing changes that may have occurred since the last time you refreshed the page.
- Assign Toolbar: These buttons control what you are assigning. The active buttons available change based on which page you open, Patient Assign or Department Assign. On the Patient Assign page, the active buttons are Patients, Devices, Duties, and Relief.
- Summary Toolbar: These buttons control the summary views of the Patient Assign page. The active buttons also change based on which page you open. When you are on the Patient Assign page, the active buttons are Patient and Caregiver.
- Printable View: Click this button to open a printable view of the current patient assignment information. Click the arrow on the right side of the button to open the Printable View Options menu:
- Show Patient Names check box: Select this check box when you want to include patient names on the Patient Assign printable view. Deselect the check box to suppress patient names and patient encounter numbers in the printable view.
- Basic Format: Select this check box to print a simpler version of the Patient Assign Printable view. The Basic Format uses a grid format to display rooms, patient names, and the full names and skills of the assigned caregivers only. Note that if you have not selected Show Patient Names, the Basic Format replaces patient names with asterisks.
- Demand Coverage Only: You can only select this check box if you have selected the Basic Format check box. Select this check box to limit the Basic Format printable view to just those caregivers whose assignment roles meet demand needs (that is, patient workload).
- Action Buttons: These buttons provide information and perform the following actions:
- Shift Note: Click this button to create, view, and edit shift notes. When there is no note available, the icon has a blue plus (+) sign. When there is a note on file, the icon has a red star.
- Send Message button: If your Assignment Manager configuration includes the optional CareAware iBus integration, your toolbar includes a Send Message button. Click this button to send a message to one or more caregivers with assigned communication devices. This feature requires that iBus with Communication Device Services be enabled for your organization. To add this optional feature to your configuration, contact your Clinical Consultant or Client Advocate.
- Assignment Sync Status Button: If your configuration uses CareAware iBus to maintain personnel and patient data, Assignment Manager automatically checks that its patient and caregiver data matches the data on CareAware iBus when opening the Patient Assign page. The Sync Status button displays the synchronization status between the data in Assignment Manager and CareAware iBus. If all data is synchronized, the button is green and disabled:
 . If there are synchronization issues, the button is yellow and enabled:
  . You can click the button to open the Assignment Sync Status window so that you can review the issues.
- Acuity Summary and Acuity Summary Table: For organizations using the optional Outcomes-Driven Acuity application, Assignment Manager displays an Acuity Summary table showing the current number of patients in each acuity level and the average patient acuity. Since the Acuity Summary Table displays only current patient acuity, the table is not displayed when you select a shift in the past.
- Utilization Table: This table summarizes the demand hours and available hours, utilization percentage, and skill to patient ratio for each caregiver skill configured for Demand Manager or set to Pt. Events in Staff Manager Client staffed or required during the selected shift category partition. Assignment Manager calculates the staffing ratio by dividing the number of patients by the number of employees working in the shift category partition. The number of employees is calculated by taking the total employee hours for a skill during the shift category partition and dividing by the FTE conversion factor (converted to hours) or the length of the shift category partition in hours, whichever is less. Assignment Manager calculates the utilization percentage as Demand Hours divided by Available Hours.
- If an Other patient event is affecting the Demand Hours Total, you see a capital E beside the Total value, such as E60.20. You also see a capital E beside the skill total, based on the Global Skill defined for the event.
- If staffing minimums are affecting the Demand Hours Total, you see a lowercase m beside the Total value, such as m8.00. You also see a lowercase m beside the skill total based on the Global Skill associated with the minimum demand target.
- If Other patient events and staffing minimums are affecting the Demand Hours Total, you see mE beside the Total value, such as mE12.00. You also see mE beside the affected global skill.
- Charge Nurses(s) Box: This box displays the currently assigned charge nurse. If the box is empty, no charge nurse has been assigned.
- Current Census and Projected Arrivals and Departures: The current census is number of patients currently in the selected profile. Patient Assign displays projected arrivals and departures so that you are aware of expected events that may affect your patient assignment decisions. The application calculates projected departures automatically based on the number of patients with a departure or discharge date and time on the Demand Manager Administer Patient Pattern window within your selected Shift Partition. You can control expected arrivals with the Assign Patients page.
The Summary by Patient View
By default, the Patient Assign page opens with the Summary By Patient in view. You can switch between the Patient and Caregiver summaries clicking the corresponding Summary button.
The Summary by Patient sorts patients first by Room/Bed. After you save assignments, the Summary by Patient sorts by Future Arrivals, unassigned status, then by Room/Bed. This puts patients without caregivers or without enough caregiver time at the top of the list; however, you can sort the summary by clicking on some select column headings. One click sorts the data in ascending order (lowest to highest), and two clicks sorts in descending order (highest to lowest). The sort arrow shows you which column is currently being used to sort the summary; when the arrow points up, the data is in ascending order, and when the arrow points down, the data is in descending order.
Depending on your configuration, you may see columns for patient and caregiver gender. In addition, you may see patient and caregiver names in different formats, such as Last Name, First Name; First Name Middle Name Last Name; or (for caregivers) Employee Abbreviation. See Configuring Facility Settings: The Patient and Caregiver Identifiers Tab for more information.
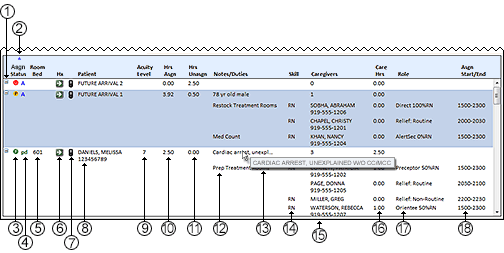
- Expand/Collapse Row icons

 : Click these icons to expand or collapse the caregiver information rows. By default, the page opens with all rows expanded.
- Sort arrow: The sort arrow shows which column the table is currently sorted by and whether the sort is in ascending order (up arrow) or descending order (down arrow). You can sort the table by any column by clicking the column heading.
- Asgn Status (Assignment Status) Icon: The Assignment Status icon tells you at a glance whether the patient has had any caregivers with a Required Role assigned. There are three status icons:
- Unassigned
 : Assignment Manager considers a patient unassigned if no one has assigned a required role to that patient at any point during the partition.
 - Partially Assigned
 : Assignment Manager considers a patient partially assigned if someone has assigned that patient a required role, but for only part of the partition.
 - Fully Assigned
 : Assignment Manager considers a patient fully assigned if someone has assigned a required role to that patient for the full length of the partition or the length of time the patient is in the profile during the partition
 - Click the Status column heading to sort the patient list by unassigned, partially assigned, and fully assigned status.
- Arrival and Departure Icons
- A blue A indicates a patient who has been admitted or transferred in during this shift or for a future arrival that has been assigned to a caregiver.
- A green pd indicates a patient who is projected to be transferred out during this shift. The solution calculates projected workload for each patient at the current acuity level (if implemented) and includes the average time it takes to transfer a patient out.
- A green pD indicates a patient who is projected to be discharged during this shift. The solution calculates projected workload for each patient at the current acuity level (if implemented) and includes the average time it takes to discharge the patient
- A green d indicates a patient who has been transferred out during this shift. Assignment Manager automatically ends a patient’s current assignment once receiving a transfer out event from the Registration Import.
- A green D indicates a patient who has been discharged during this shift. Assignment Manager automatically ends a patient’s current assignment once receiving a discharge event from the Registration Import.
- A red pd or pD indicates a patient who currently has a projected departure or discharge date and time prior to the current shift on the Demand Manager Administer Patient Pattern window. If a patient has both a departure and discharge date and time in the past, pD is displayed for the discharge. When you see a patient with pd or pD, you should review the patient's projected departure and discharge dates. If you do not expect the departure or discharge to occur in the shift that you are making assignments for, you should correct the time (and the date, if needed) in the Administer Patient Pattern Window or in the source system interfaced to Demand Manager. This is a best practice because a projected departure or discharge during the shift affects patient workload and so affects the assignment of patients. All patient assignment users should keep this data current. The solution calculates projected workload for each patient at the current acuity level (if implemented) up to the pattern end and does not include the average time it takes to transfer a patient out or discharge them for any patient with a red pd or pD indicator.
- Room/Bed: Where the patient currently is. When viewing past assignments, this column displays the room and bed the patient was in. If the patient was in multiple rooms or beds during the selected shift category partition, the patient's last room and bed is displayed. Click the room and bed column to sort the patient list by ascending or descending order.
- Assignment History Icon
 : Click this icon to open the Assignment History window. This window displays all assignments made for the selected patient.
- (Optional) Patient Gender: Depending on how your organization has configured patient identifiers, you may see a Patient Gender column. The application lists genders using the following abbreviations:
- F: Female
- M: Male
- O: Other
- U: Unknown
- Send Message icon: If your Assignment Manager application includes the optional iBus with Communication Device Services integration, you see a Send Message icon
 for caregivers with devices assigned for the current shift. Click the icon to open the Send Message window, where you can send a message to the caregiver's assigned device. This feature requires that iBus with Communication Device Services be enabled for your organization. Note that the Send Message icon is enabled for caregivers with devices assigned and that messages can be sent only during the current shift. To add this optional feature to your configuration, contact your Clinical Consultant or Client Advocate.
- Patient Name and Identifier: The table displays the patient name and, depending on your configuration, one or two patient identifiers below it, such as the Patient Encounter Number. You may also be able to position your pointer over the patient's name to see additional patient identifiers. Click the Patient Name column to sort the patient list alphabeticly based on your configured name format. If patient names are displayed in Last Name, First Name Middle Name order, the column sorts patients alphabeticly by last name. If patient names are displayed in First Name Middle Name Last Name order, the column sorts patients alphabeticly by first name.
- Acuity Level (in organizations with the optional Outcomes-Driven Acuity application installed): The patient's acuity level. When you are reviewing patient assignments for the current shift, Assignment Manager displays the acuity level and care hours in effect when you opened the page. When you are reviewing previous dates and shifts, Assignment Manager displays the acuity level that was in effect at the end of the shift. Note that if someone modified an existing assessment or entered a new assessment for the shift after the shift was completed, the application updates the acuity level and associated care hours using the new assessment data. Click the acuity level column to sort the patient list by acuity level, lowest to highest.
- An arrow next to the acuity level means the patient’s acuity level has changed since the current assignment was saved. If the arrow points up, the acuity level has increased; if the arrow points down, the acuity level has decreased.
- The letter E next to the acuity level means that the patient has an Other patient event in progress or has one expected to start during the shift. Positioning your pointer over the E displays the caregiver to patient ratio, global skill, and the hours of the shift affected by the event.
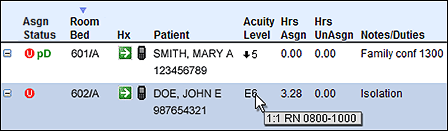
- Hrs Asgn (Hours Assigned): The total number of patient demand hours assigned to one or more caregivers. Click the Hours Asgn column to sort the patient list by lowest to highest number of care hours assigned.
- Hrs UnAsgn (Hours Unassigned): The patient's required demand hours minus the hours already assigned to the caregiver. Click the Hours UnAsgn column to sort the patient list by the number of care hours that remain unassigned.
- Notes/Duties Column with Hover Feature: Depending on how your organization has configured Patient Assignment, the Note column displays either Patient Encounter Notes or diagnosis information from the registration interface for each patient. Employee Assignment notes from Staff Manager Client and additional duties are shown for caregivers. If no information is available for the patient or the caregiver, the Note area is blank.
- Notes/Duties Hover Feature: Positioning your pointer over Note information displays the entire message text in a tooltip.
- Skill: The skill associated with the caregiver's scheduled task for this shift category partition, such as RN, UAP, or LPN. Schedulers maintain employee skills in Staff Manager Client.
- (Optional) Caregiver Gender: Depending on how your organization has configured patient identifiers, you may see a Caregiver Gender column. This column uses the same gender abbreviations as the Patient Gender column: F, M, O, and U.
- Caregivers: The top row displays the number of caregivers assigned to this patient. The bottom row or rows show the caregivers' names or abbreviations, depending on your configuration. If the caregiver has a communication device assigned, the number for the assigned device displays under the caregiver. This column has a hover feature: positioning your pointer over a caregiver displays the entire name in a tooltip. If the caregiver is from another profile, the tooltip also displays the scheduled profile information.
- Care Hrs (Care Hours): The number of patient care hours assigned to the individual caregiver for this patient.
- Role: The caregiver's assigned role for this patient, such as Direct, Indirect, or Sitter.
- Assign Start/End: The time the caregiver is assigned to care for the patient during the current shift; you can edit these times on the Add Patient Assignments window.
The Summary by Caregiver View
By default, the Patient Assignment page opens with the Summary By Patient in view. To switch to the Caregiver view, click the Caregiver summary button.
This view provides information similar to the Summary By Patient view but regarding individual caregivers. By default, the view is sorted by global skill display order, caregiver name, but you can sort the table by any column by clicking the column heading. One click sorts the data in ascending order (lowest to highest), and two clicks sorts in descending order (highest to lowest). The sort arrow shows you which column is currently being used to sort the table; when the arrow points up, the data is in ascending order, and when the arrow points down, the data is in descending order.
- Skill: The skill associated with the caregiver's scheduled task for this shift category partition, such as RN, UAP, or LPN. Employee skills are managed in Staff Manager Client. Click the Skill column to sort the list of caregivers by skill display order.
- (Optional) Caregiver Gender: Depending on how your organization has configured patient identifiers, you may see a Caregiver Gender column. This column uses the same gender abbreviations as the Patient Gender column: F, M, O, and U.
- Caregiver: The caregiver's name or abbreviation, depending on your configuration. Positioning your pointer over a caregiver's name displays the entire name in a tooltip. If the caregiver is from another profile, the tooltip also displays the caregiver's home profile. If applicable, any communication device numbers assigned to caregivers are displayed under their names. The names of staff assigned to this location through Department Assign are displayed at the end of the caregiver list, as are their assigned device numbers, if applicable. Position your pointer over the staff names to see their scheduled departments. Click the Caregiver Name column to sort the list alphabeticly based on your configured name format. Depending on your configuration, names are displayed in one of the following formats:
- Last Name, First Name
- First Name Middle Name Last Name
- Employee Abbreviation
- Hrs Asgn (Hours Assigned): The total number of patient demand hours plus time associated with any additional duty assigned to the caregiver. Click the Hrs Asgn column to sort the list of caregivers by hours assigned.
- % Asgn or Hrs UnAsgn: Depending on your Patient Assign settings, this column heading reads Unasg Hrs or % Asgn. Click the % Asgn or Hrs UnAsgn column to sort the caregiver list by % Asgn or Hrs UnAsgn lowest to highest. Arrival and Departure icons also display in this column, if applicable.
- % Asgn: Standing for Percent Assigned, the application calculates this value as Hours Assigned divided by Hours Available. A caregiver with 8.00 Hours Available and 6.00 Hours Asgned has a % Asgn value of 75.0%. You can over-assign hours, which results in a negative Unasg Hrs value (such as -2.25) or a % Asgn value of over 100% (such as 124.2%). The Asgn Hrs column value then displays in red to alert you of the overage.
- Hrs Unasgn: Standing for Hours Unassigned, the solution calculates this value by subtracting the caregiver's Assigned Hours from the Hours Available. A caregiver with 8.00 Hours Available and 6.00 Assigned Hours has an Unassigned Hours value of 2.00. This tells the manager that the caregiver can handle an additional patient who needs 2.00 hours or less of care.
- Room Bed: The patient's current location.
- (Optional) Patient Gender: Depending on how your organization has configured patient identifiers, you may see a Patient Gender column. The application lists genders using the abbreviations F, M, O, and U, as described above.
- Patients: The top row displays the number of patients assigned to this caregiver. The bottom row or rows show the patients' names followed by one or two patient identifiers, based on your configuration.
- Avg Acuity (where organizations have installed the optional Outcomes-Driven Acuity application): The top row displays the average acuity of all patients assigned to the caregiver. The bottom row or rows show the current acuity level or acuity level at the time assignments were last saved for the patient or patients. Click the Avg Acuity column to sort the list of caregivers by average acuity lowest to highest.
- Role: The caregiver's assigned role for this patient, such as Direct 100% RN, Relief: Routine, or Sitter 100% PCA.
- Care Hrs (Care Hours): The number of patient care hours assigned to the caregiver for this patient.
- Caregiver Start/End: The top row displays the coverage time the caregiver is scheduled. You can edit these times in the Add Patient Assignments window, if necessary, to facilitate making patient assignments. The bottom row or rows show the start and end time of the caregiver's assignment to each patient. Click the Caregiver Start/End column to sort the list of caregivers by scheduled start time.
- Notes/Duties Column with Hover Feature: Depending on how your organization has configured Patient Assign, this column displays either Patient Encounter Notes or diagnosis information from the registration interface for each patient. Employee Assignment notes entered in Schedule Editor or Daily Editor may also be displayed for caregivers with a note for the shift. Positioning your pointer over Note information displays the entire message text in a tooltip. If no information is available for the caregiver, the Note area is blank. If the caregiver has an assigned additional duty, such as checking crash carts, the table displays that information in this column also.
Pattern End Dates and Target Care Hours Calculations
The Patient Assignment page calculates care hours based on the pattern end date and time for each patient’s pattern. The best practice standard for patient assignment is to first review the Administer Patient Pattern window for patients with a projected departure date in both the current and next shift. If the date or the time or both are not accurate, you should update them on the Administer Patient Pattern window or in the source system interfaced to Demand Manager. You can use either method; Demand Manager processes and displays dates in the order the solution received them. This means that a projected discharge date and time edit received from the source system interface can overwrite a user's projected discharge edit on the Administer Patient Pattern page. Updating future projected dates for each patient establishes a new pattern end date and time on the Patient Pattern Management page for the patient. This process ensures the most accurate projected workload for the current and next shift.
The pattern bar end date and time on the Patient Pattern Management page pushes forward automatically every 15 minutes using the push forward duration in hours and threshold minutes defined for the application. For example, if the push forward duration is 72 hours and the threshold minutes are 720 minutes, every 15 minutes the system looks for patient patterns that end in the next 720 minutes (12 hours) and push the patterns forward 72 hours. The system then calculates care hours for these patients for the next 72 hours. This process repeats every 15 minutes until Demand Manager receives a transfer or discharge event or the patient's projected departure or discharge date and time is changed in the Administer Patient Pattern window, thus redefining the pattern end. There are two ways you can change a patient's projected departure or projected discharge date and time: by changing the projected date and time manually (either on the Administer Patient Pattern window or in the source system interfaced with Demand Manager) or by assigning the patient a new progress pattern.
If your processes ensure that projected departure dates and times are accurate and up to date at all times in Demand Manager, either through manual entry or an interfaced solution, the duration and threshold minutes should be set to minimum values, such as duration of 1 to 2 hours and threshold minutes of 15 minutes. This means that every 15 minutes the system pushes patterns that end in 15 minutes forward one hour. This ensures the most accurate workload for the next hour.
The result of Demand Manager automatically pushing pattern end dates and time out is that the Patient Assignment page can display different care hours for patients with the same pattern and acuity levels because the patients have different pattern end dates and times.
Demand Manager does not change the date and time on the Administer Patient Pattern window when pushing patterns, as the application uses this date and time to generate patient length of stay alerts.
 Related Topics